Cloud converter · v3 engine
Turn a Java pack into a Bedrock pack.
Upload a .zip, pick a mapping style, and get back a Bedrock pack with its Geyser mappings. Most packs finish in about five minutes. Below that, two studios — a GUI Maker for container menus and a HUD Maker for on-screen overlays.
Getting started
The recommended path
If you're not sure where to begin, follow these three. Everything else on this page is detail you reach for only when you need it.
01 Use Nexo with Item ModelsThe most stable combination on Bedrock. Turn obfuscation off, include your items folder. 02 Let the Nova plugin do itOne command in-game gathers your pack, converts, and installs to Geyser for you. 03 Only if items conflict — open the inspectorFix a single problem entry without re-converting the whole pack.The converter
Upload & options
Drop a zip, choose a mapping style, start. Refreshing the page is safe — the job reattaches to your session.
Zip the contents, not the folder
This is the single most common upload mistake. Your zip has to open directly onto the pack contents.
├─ assets/
├─ pack.mcmeta
└─ pack.png
└─ MyPack/ wrong
├─ assets/
└─ pack.mcmeta
On Windows: open the pack folder, select everything inside it, then Send to → Compressed (zipped) folder. Selecting the folder itself creates the broken layout above.
Mapping style
Legacy
Items keyed by a custom_model_data number. Fits most classic packs.
Definitions
Modern minecraft:item_model IDs — 1.21.4-style packs, and Nexo with prefer_item_models: true.
Not sure? Start with Legacy. If the pack turns out modern, a Modern item format detected prompt offers to switch — no re-upload.
Options
| Option | Default | What it does |
|---|---|---|
| Transparency | On | Handles overlapping transparent item layers. Leave it on — off can render layered items wrong. |
| Convert unmapped models | Off | Includes orphan models that exist in the pack but nothing points at. Turn on if items you know exist are missing. Makes the pack larger. |
| MEG4 / BetterModel | Off | Converts a models/ folder of .bbmodel. See MEG4. |
| Custom fonts | Off | Converts Java glyph providers to Bedrock pages. See Fonts. |
| Glyph review | Off | Pauses so you can check glyph placement before the pack is assembled. See Fonts. |
In-game
Nova plugin
The hands-off path. One command gathers your pack and plugin files, converts them, and installs the result to Geyser for you.
→ join Discord for the current release and setup ↓Nova Geyser extension for auto-upload
→ drop in
Geyser-.../extensions/
↓OpenHudBar HUD Maker access required→ HUD Maker or UI Suite · drop in
plugins/
plugins/ and start the server once to generate the config.account:
api-key: "your-key-here"plugins/Nova/config.yml. One key covers every plan — your limits are decided server-side./nova status to confirm your tier and that the key is valid.Want packs installed automatically? Add the Nova Geyser extension above to Geyser-.../extensions/ and set geyser-upload: true in the config. After that, the only thing you ever touch is the API key — every conversion is pushed into geyser/packs and its mappings applied for you.
Commands
| Command | What it does |
|---|---|
/nova convert nexo [definitions|legacy] | Convert your Nexo pack |
/nova convert itemsadder [definitions|legacy] | Same for ItemsAdder |
/nova convert gui | Open a GUI builder session bound to your account |
/nova status | Tier + API key check |
/nova reload | Reload config.yml without a restart |
/nova debug | Last failure trace log |
All commands need nova.convert (default: op). Progress shows on a boss bar and your action bar — no chat spam.
After conversion
Install the output
If you're not using the Nova plugin's auto-upload, install by hand. It's three files in three places — plus one optional extension each for 3D display items and MEG4 models.
Doing it in-game? The Nova plugin with the Geyser extension installed uploads all of this for you — skip straight to the bottom.
Manual install
.mcpack from the output inside Geyser-.../packs/ (or apply it directly as a Bedrock pack).Geyser-.../custom_mappings/./reload — packs and mappings only load on startup.├─ packs/ ← your .mcpack files
├─ custom_mappings/ ← the mapping .json
└─ extensions/ ← the two extensions below
3D display items (furniture, plushies, crops)
If your pack has 3D display items, the converter also outputs a geyser_display_entities file. It's read by the GeyserDisplayEntity extension, which you install once:
→ drop in
Geyser-.../extensions/
↓GeyserDisplayEntityPack .mcpack→ drop in
Geyser-.../packs/
MEG4 / BetterModel models
Converted entity models run through GeyserModelEngine — a Geyser extension plus a server plugin. On a proxy network, put the plugin on your backend (sub-)servers only, not the proxy.
→ drop in
Geyser-.../extensions/
↓GeyserModelEngine server plugin jar→ drop in
plugins/ (backend servers only)
The extension reads Novaic's converted model bundle, generates the runtime Bedrock pack itself, and loads it. Do not copy a separate MEG4 or BetterModel pack into Geyser-.../packs/ by hand.
GeyserUtils bridge
Install GeyserUtils-Geyser in Geyser's extensions folder, then install exactly one matching bridge jar for your server or proxy. This is needed by integrations that exchange live server data with Geyser.
→ Geyser-.../extensions/ ↓GeyserUtils-Spigot
→ your Spigot or Paper server plugins/ folder ↓GeyserUtils-Velocity
→ your Velocity proxy plugins/ folder, if used ↓GeyserUtils-Bungee
→ your BungeeCord proxy plugins/ folder, if used
The automatic way. With the Nova plugin, the Geyser extension installed, and geyser-upload: true, the pack and mappings land in geyser/packs on their own — no copying.
Download and keep a copy. Converted packs are kept for a short window, then removed — the uploader shows the current limit.
Plugin pack
Convert Nexo
Check which item format Nexo generates, match it here, and include your Nexo/items folder.
Nexo/settings.yml
Pack:
  generation:
    prefer_item_models: true

OBFUSCATION: NONE
Obfuscation must be NONE. It exists to stop tools from reading the pack — and it stops this one too. This is the biggest single cause of a broken result.
| Your setting | Choose |
|---|---|
prefer_item_models: true | Definitions |
prefer_item_models: false | Legacy |
Run /nexo reload so the pack reflects the settings above.
Nexo/items beside assets/
├─ assets/…
├─ Nexo/
│ └─ items/…
├─ pack.mcmeta
└─ pack.png
It sits beside assets/, not inside it. Without it, more items need materials assigned by hand.
The zip should open onto assets/, Nexo/, pack.mcmeta, pack.png.
Or skip all of it: /nova convert nexo collects the pack and your item files for you — see Nova plugin.
Plugin pack
Convert ItemsAdder
Disable every protection, enable legacy CIT armor, regenerate, then upload the generated zip with its contents folder.
In plugins/ItemsAdder/config.yml:
zip:
  protect-file-from-unzip:
    protection_1: false
    protection_2: false
    protection_3: false
short_texture_references: falseresource-pack:
protect-pack: false
obfuscation:
enabled: falseRequired for armor — without it, custom armor has no source to convert from.
zip:
  custom_armors_shaders_legacy:
    optifine:
      generate_cit:
1_20_4_lower: trueRun /iareload, then /iazip. Output lands at plugins/ItemsAdder/output/generated.zip.
Extract it and put contents/ at the root, beside assets/:
├─ assets/…
├─ ItemsAdder/
│ └─ contents/…
└─ pack.mcmeta
Use Legacy as the mapping style.
Upload the generated pack whole. Hand-picking files out of it breaks armor.
Entity models
MEG4 / BetterModel
Convert a folder of .bbmodel files to GeyserModelEngine.
Put your .bbmodel files in a models/ folder at the pack root, then turn on MEG4 / BetterModel models on the upload screen — it's off by default, so the folder alone won't convert. Discovered models appear under Model Targets to search and select.
├─ assets/…
├─ models/
│ ├─ my_mob.bbmodel
│ └─ my_pet.bbmodel
└─ pack.mcmeta
From a server, set converter.model-engine: true and blueprints from plugins/ModelEngine/blueprints/ and plugins/BetterModel/models ride along with every conversion.
During conversion
Material review
Some converted models have no base material defined — nothing in the pack says which vanilla item they should sit on. The panel lists them, each row showing the model with its icon.
| You do | You get |
|---|---|
| Pick a material from the list, or type any id | paper means minecraft:paper |
| Select several rows, set the material on the first | It fills the rest |
| Leave a row empty | That model is skipped — not in the output |
| Nothing | The timer auto-resumes and skips unassigned rows |
In-game, you get clickable [Approve] / [Skip] buttons in chat. Ignore them and it auto-skips after 60 seconds.
Fewer prompts: include your plugin's item folder — Nexo/items or ItemsAdder/contents. Items whose material is declared there never reach this list.
During conversion
Fonts & glyphs
Turn your custom emojis, icons and symbols into Bedrock glyph pages. Three related switches — one to convert, two to shape the result, one to review it.
The main switch. Reads your Java glyph providers and writes them as Bedrock font pages. Leave it off and none of the rest applies.
Caps the size of each generated glyph cell (8, 16, 32, 64, 128 or 256 px). Any source glyph larger than the cap is skipped rather than shrunk. Lower it for lighter font pages.
When a page mixes small and large glyphs, the small ones can end up too tiny next to your text. This upscales them so a mixed-size font lines up evenly.
Pauses so you can go through the glyphs one by one before the pack is assembled. For each glyph you can:
Fonts are handled first, so the review opens as soon as they're ready and the rest of the conversion keeps running while you look. You can skip the whole review and let it assemble as-is.
Extra tool
Mapping inspector
Open a finished mapping, see every entry with its icon, and switch a problem item between formats — no re-conversion.
geyser_custom_item_mappings.json..mcpack so icons read from its textures — a wall of ids becomes entries you recognise.Reach for it when Geyser rejects an entry, or two items fight over the same slot — instead of re-converting the whole pack.
Capabilities
What's supported
Basic is a limited local Nova plugin tier. Premium is the full converter. GUI Maker and HUD Maker are separate UI add-ons.
Basic — Nova plugin
- Nova plugin access only
- Local conversion of up to 150 unique Java item models
- No web upload or hosted web conversion
- GUI Maker and HUD Maker are not included
Premium
- Web upload & conversion
- 2D items, 3D items and animated models
- 3D furniture, plushies and crops via Geyser DisplayEntity
- Custom armor, generated inventory icons, 3D bows and crossbows
- Custom blocks with custom geometry and faces
- Font conversion with glyph review, custom sounds and transparency
- Geyser V2 item-model mappings, Nexo and ItemsAdder support
- Server delivery via the Geyser extension
GUI Maker and HUD Maker are separate UI add-ons. See pricing for current plans.
UI add-ons — separate
- GUI Maker — chest and container interfaces
- HUD Maker — JsonUI HUDs and OpenHudBar delivery
- UI Suite — one add-on unlocking both makers
These add-ons are not bundled with Premium.
Studio
GUI Maker
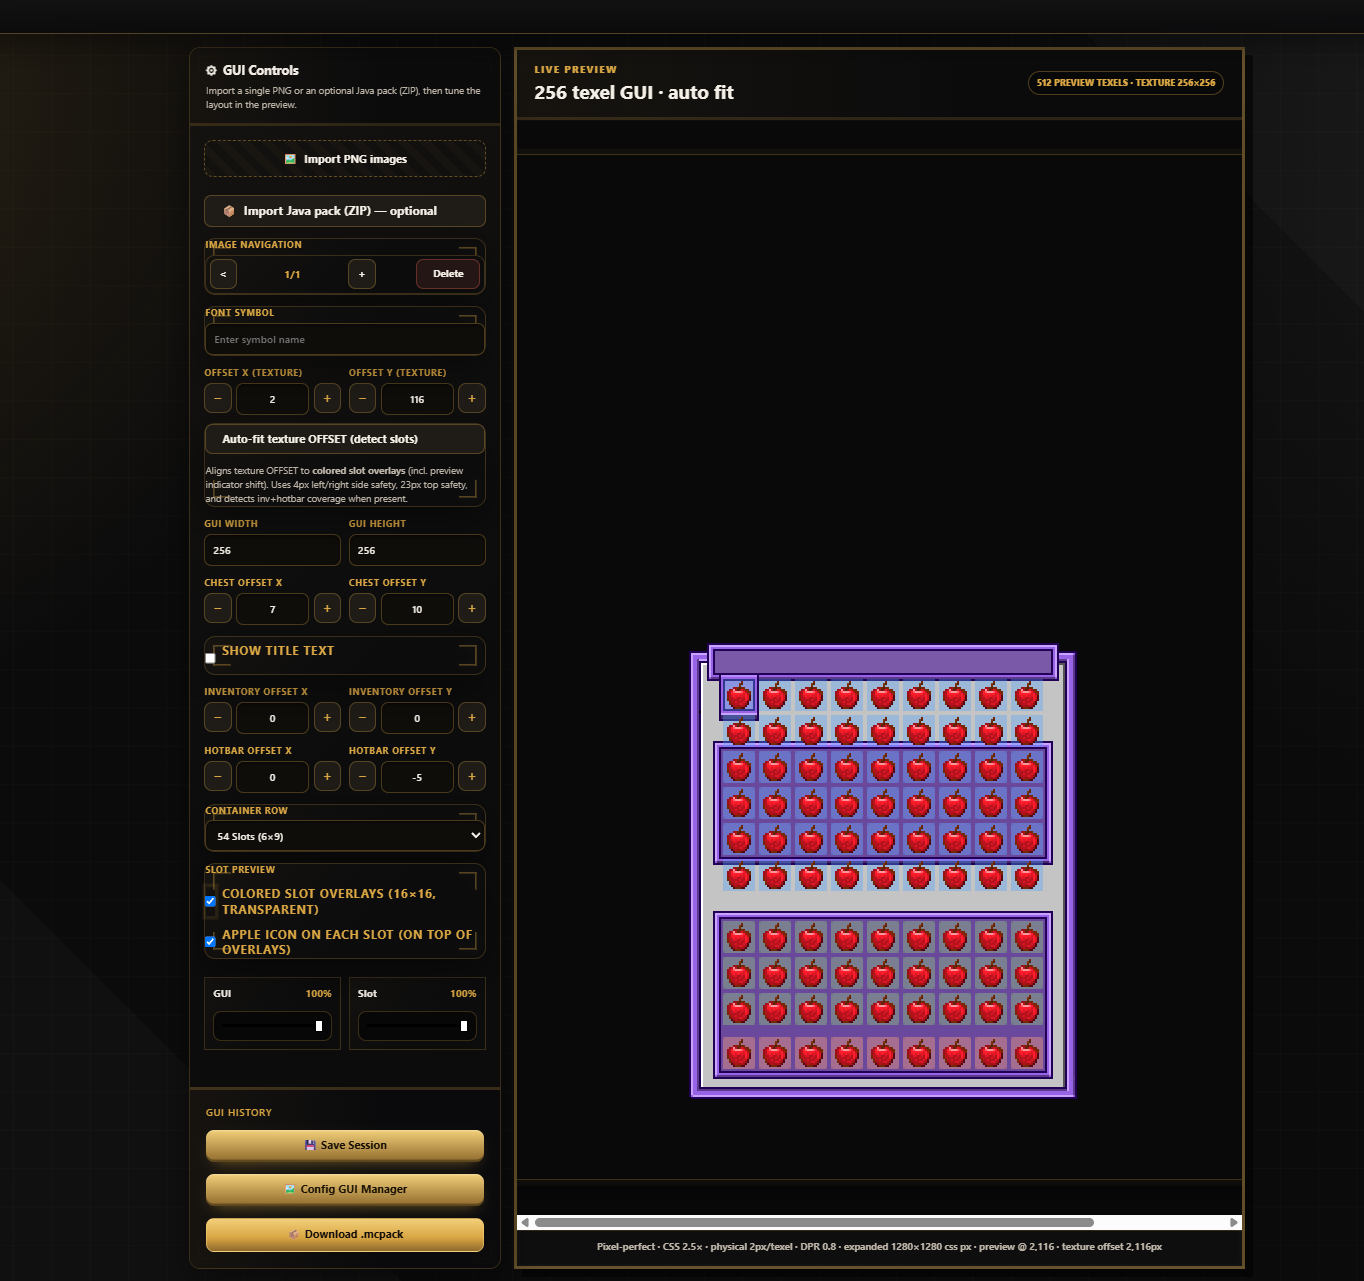
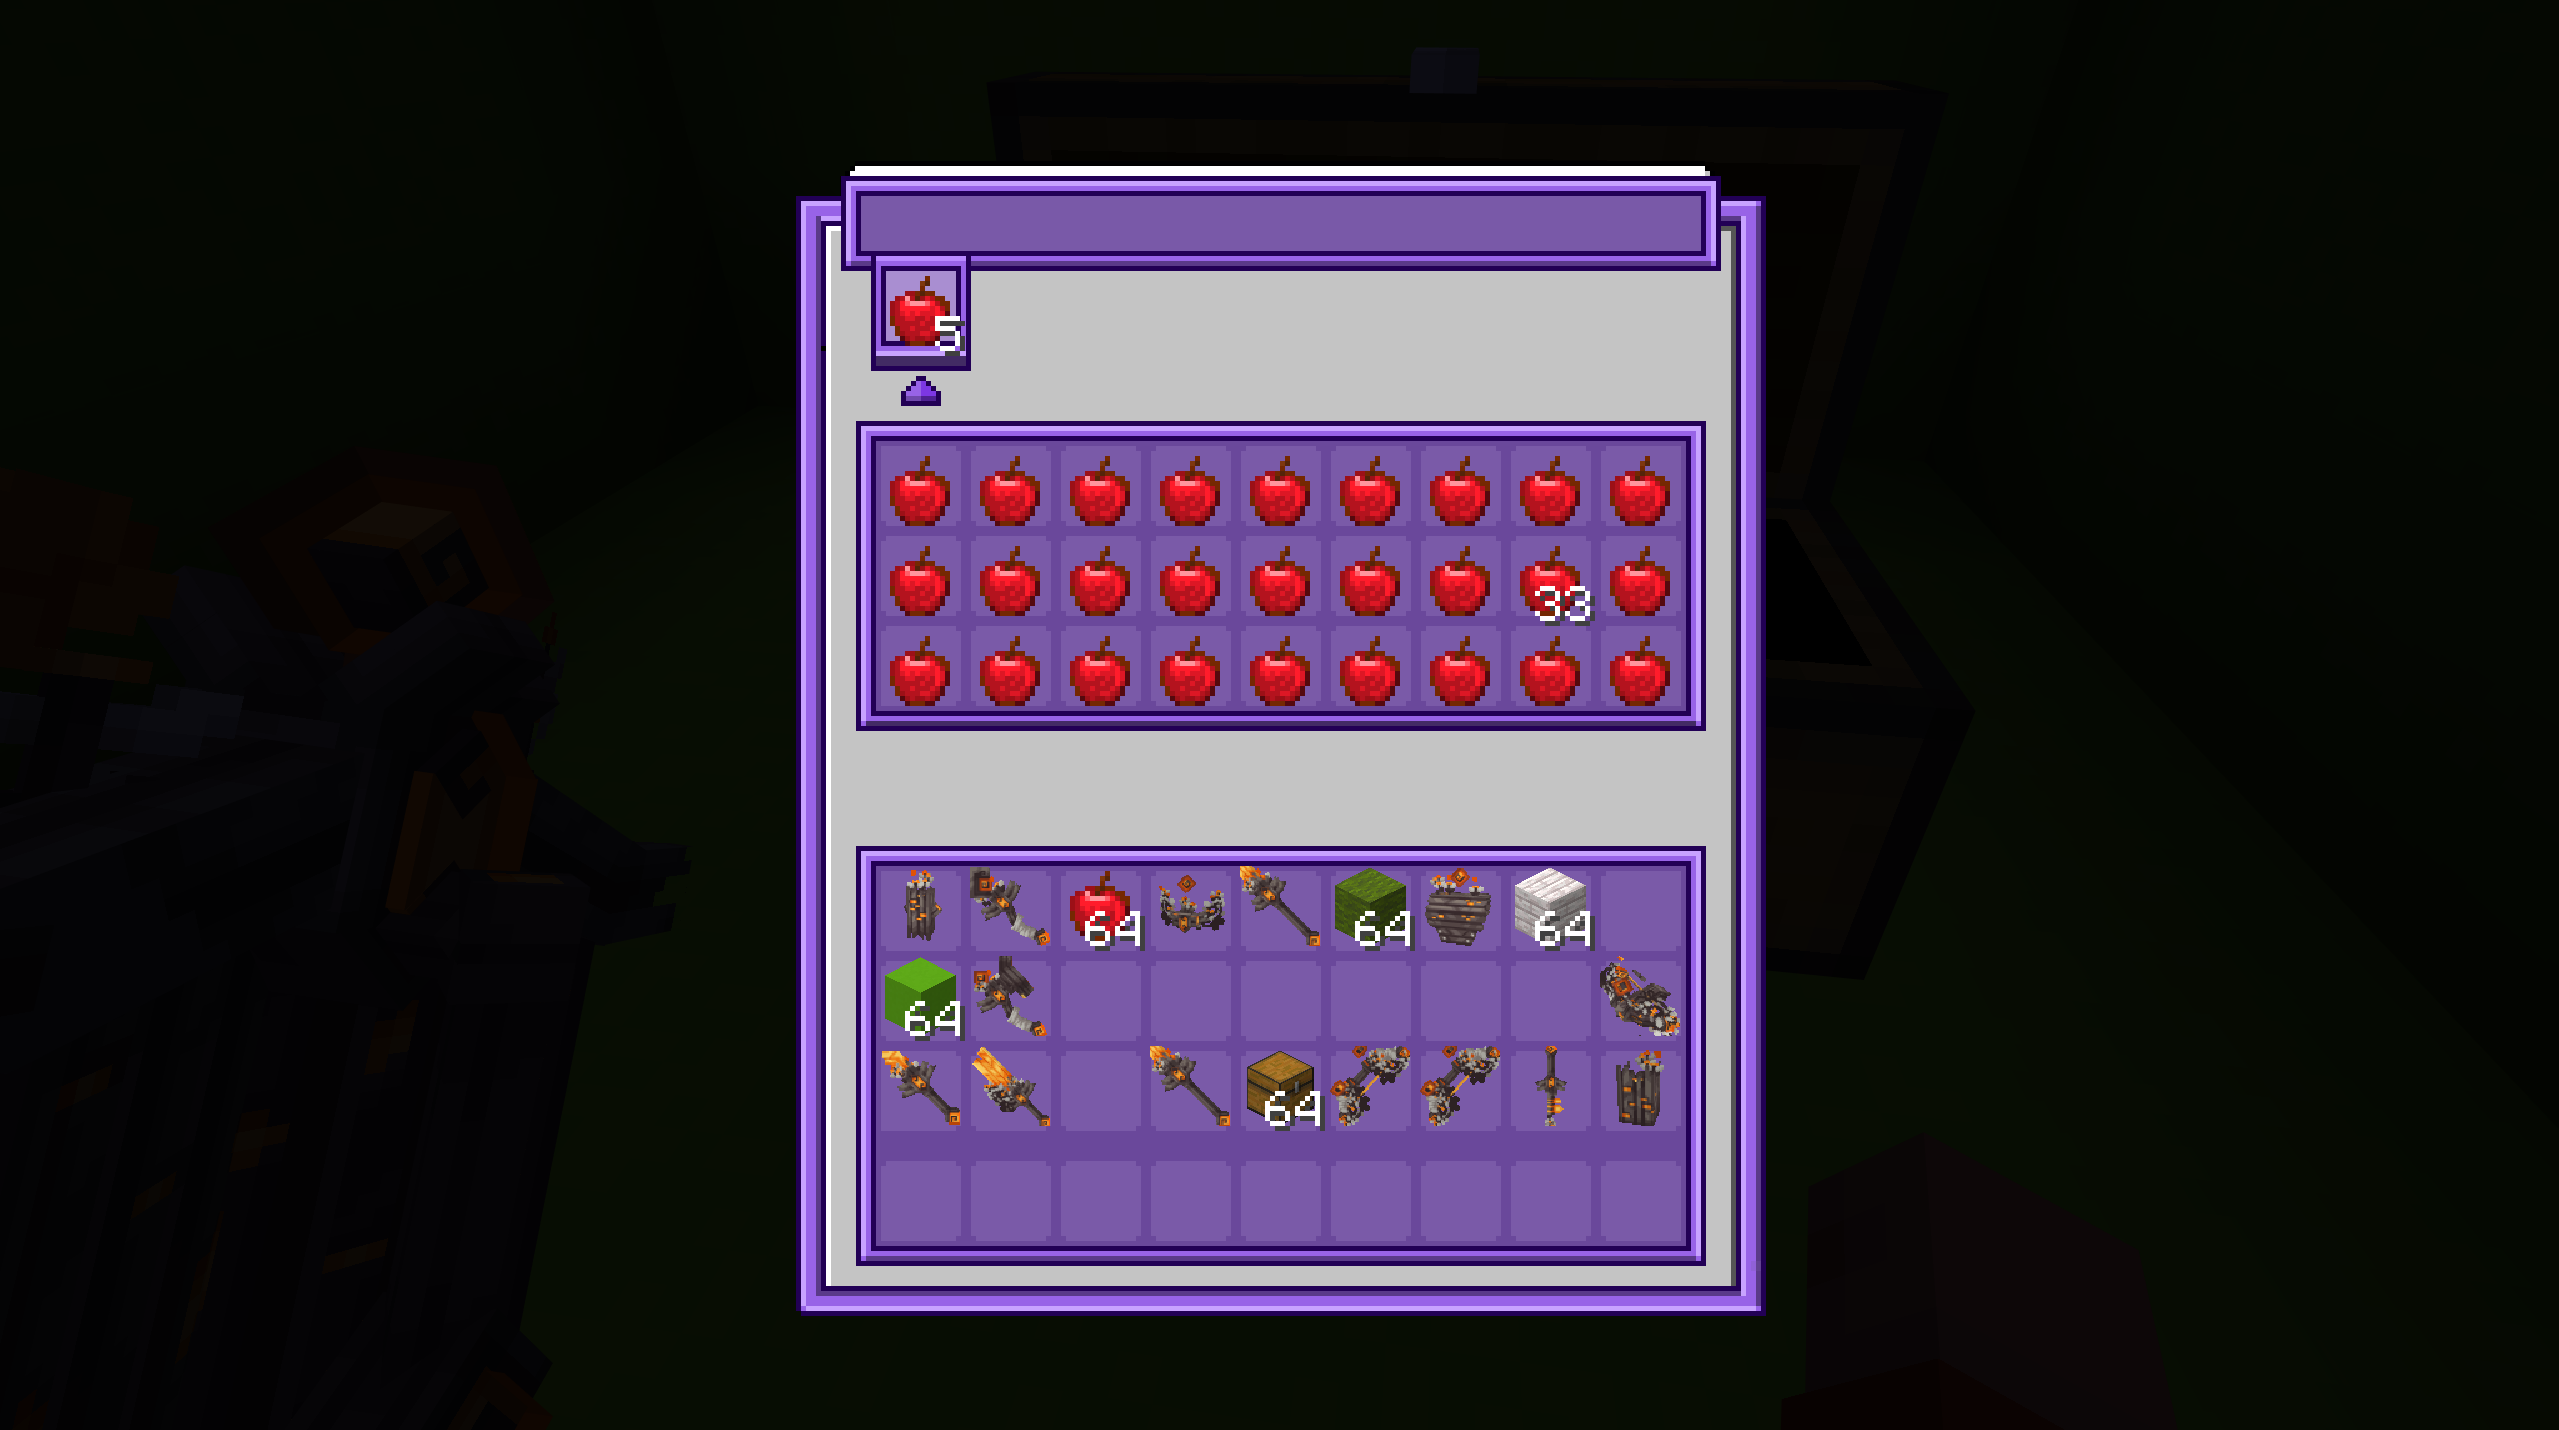
Build chest and container menus on a 512×512 canvas, line the texture up to the real slots, then export an .mcpack.
Set it up
| Control | What it does |
|---|---|
| Title | The menu's title text. It shows at the top of the container in-game, so type it here and check it fits your texture. |
| Rows | 1–6 rows of slots. The slot grid updates to match so you align against the right layout. |
| Slot offset | Nudge the slot grid itself in X/Y. Use it when your art expects the items to sit a little higher, lower, or inset from vanilla. |
| Texture offset | Move the background texture behind the slots. Pair it with slot offset to get art and slots lined up exactly. |
| Opacity | Fade the texture while you position, so you can see the slot overlays underneath. |
| Auto-fit texture OFFSET | One click aligns the texture to the slot overlays for you, instead of nudging pixels by hand. |
Import a PNG or a Java pack to start. Turn the coloured slot overlays and sample apple icons on while aligning, then off before export so they don't ship in the pack.
From in-game, /nova convert gui opens a builder session bound to your account and shows your quota. What you build flows back into geyser/packs automatically.
Reference
Troubleshooting
The problems people actually hit, and the one-line fix for each.
Upload rejected, or the pack looks empty
Your zip has a parent folder. Re-zip the contents — see Upload & options.
The converted pack is broken, or textures are wrong
Obfuscation or zip protection was left on. Turn it off, regenerate, upload the fresh pack — Nexo · ItemsAdder.
Lots of items ask for a material
The plugin folder wasn't included. Add Nexo/items/ or ItemsAdder/contents/ and convert again.
Items are missing from the output
Empty rows in Material review are skipped by design — the usual cause. If models exist but nothing points at them, turn on Convert unmapped models.
Custom armor didn't convert
On ItemsAdder: enable legacy CIT armor, run /iareload then /iazip, and upload the generated pack whole.
My HUD shows in the wrong place in-game
Almost always the anchor. Match it to the element's screen zone, keep Safe Zone at 100%, and re-test — see Position & anchors.
My HUD isn't showing at all
Restart Geyser (not /reload) so the pack loads, and confirm the OpenHudBar config from output.zip is in place. Then /ohud debug.
Geyser rejects an item, or two items conflict
Switch the problem entries in the Mapping inspector — no re-convert needed.
I refreshed and lost my progress
You didn't — conversions are tied to your session. Reopen the site signed in and the job reattaches.
"Finish or resolve your active conversion first"
A job is still open, usually one waiting on materials. Finish, skip or cancel it — or just start a fresh conversion, which supersedes your own unfinished one.
Nothing else worked
Run /nova debug for the last failure trace, or set debug: true in plugins/Nova/config.yml. Turn it back off afterwards.